Why You Need to Implement Your Own IntelliJ IDEA Plugin
IntelliJ IDEA is a powerful tool that aims at increasing productivity. It speeds up the development process and optimizes most of the standard use cases such as code formatting, code generation, navigation, etc. However, the utility of IntelliJ IDEA is not limited to these processes. For instance, I set up my IDE to generate tests prefixed with the word ‘should’. My IDE also automatically adds annotations to test classes depending on their names. But what could make an IDE even more useful is implementing an own plugin that will optimize processes that cannot be customized via standard tools. What exactly could be achieved thereby? And how complex is it? This is what I’ll try to address in this blog.

A team that works together continuously naturally develops a shared set of coding or architectural standards. In a nutshell, similar patterns arise. If it is a web application with Spring, then you might break your code into repository, service and controller levels. Or let’s say you have Event Driven architecture, then you might have some standard event classes, aggregate classes, etc. In all of these cases you can always find a pattern which can be automated. You can automatically generate some stubs for Controllers, Services and Repositories based on an Entity class. You might generate DTOs or you can generate event classes. All of these cases are partly or sometimes even fully automatable. There is no need to perform these operations manually if a machine can do it for you. Not only will you save development time, you’ll also avoid mistakes inherent to manual coding. On my current project, we automated a significant part of the development by only covering routine scenarios. Of course, the plugin will be useless once the project is done (it fully relies on project structure and our domain area). However, with regards to saving time, using the plugin ultimately pays off.
I’m going to demonstrate a simple but handy example on what you can do with the IntelliJ plugin toolkit to simplify DTO generation process.
Let’s say you have an Entity class like this:
@Entity
public class User {
    private Long id;
    private String email;
    private String password;
    private String firstName;
    private String lastName;
}
And you need to create a DTO class for the entity with only selected fields, something like this:
public class UserDTO {
    private Long id;
    private String firstName;
    private String lastName;
}
I want to implement the following scenario:
As a result, the IDE creates a DTO class with the selected fields.
Okay, let’s start. First of all, you need to create a Plugin Development project.
Then you need to introduce a new menu item (‘Generate DTO’ button). For this purpose,
you need to create two java classes and an xml configuration file. The first class should
extend BaseGenerateAction. It will represent the menu item itself:
public class DTOGenerateAction extends BaseGenerateAction {
    public DTOGenerateAction() {
        super(new DTOGenerationHandler("Select Fields for DTO Generation"));
    }
}
The second one, DTOGenerationHandler - which is an extension of GenerateMembersHandlerBase -
will look like this:
public class DTOGenerationHandler extends GenerateMembersHandlerBase {
    public DTOGenerationHandler(String title) {
        super(title);
    }

    @Override
    protected ClassMember[] getAllOriginalMembers(PsiClass psiClass) {
        return new ClassMember[0];
    }

    @Override
    protected GenerationInfo[] generateMemberPrototypes(
            PsiClass psiClass, ClassMember classMember) {
        return new GenerationInfo[0];
    }
}
In this instance, I only overrode abstract methods of GenerateMembersHandlerBase with empty
implementations (I’ll change them in future). By now I
want to be able to see the new item in the Code Generation menu without any functionality assigned to it.
Now in the xml file plugin.xml (can be found in resources/META-INF/ folder
of your project) I will add a group element
into actions declaration so that actions element will look like this:
<actions>
    <group id="DTOGenerator.SampleMenu" text="Menu">
        <add-to-group group-id="GenerateGroup" anchor="last"/>
        <action id="DTOGenerator.GenerateAction"
                class="com.shpota.dtogenerator.DTOGenerateAction"
                text="Generate DTO"/>
    </group>
</actions>
Here action defines which class to use and the name of the new item.
The add-to-group places the new menu item into an existing menu, namely the one
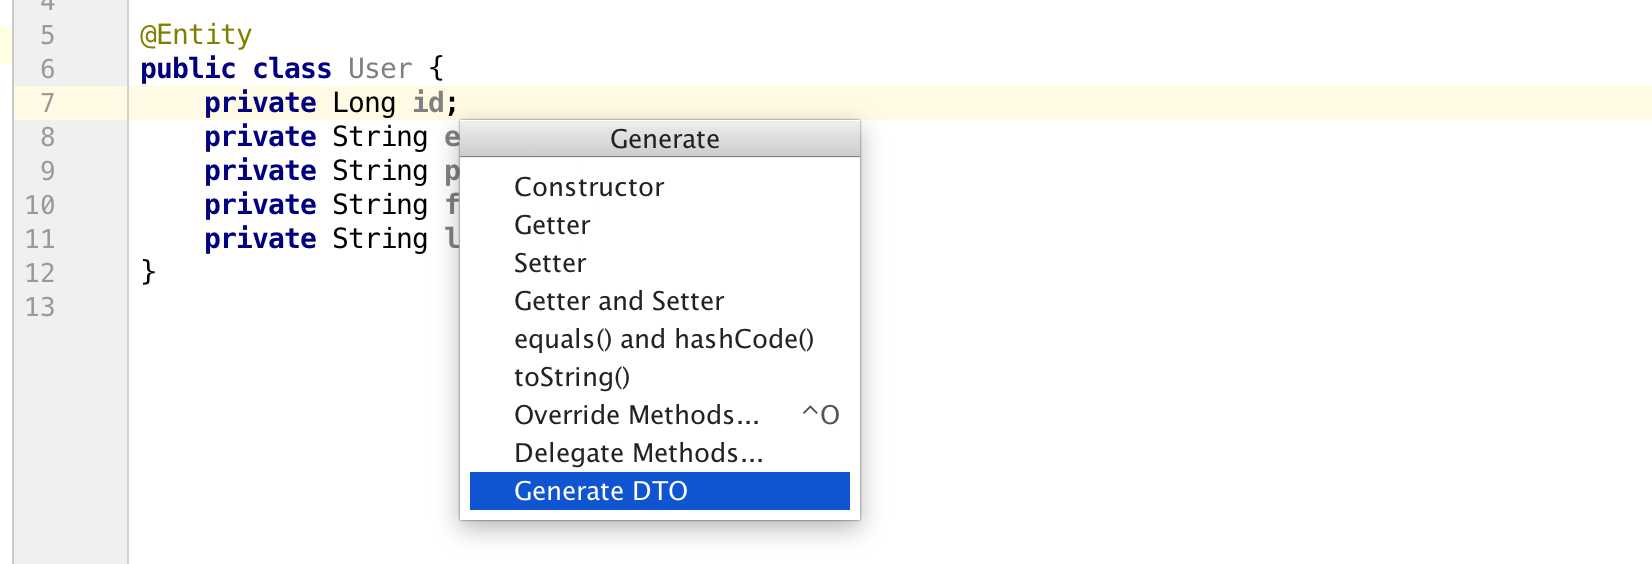
that you see when generating code.
Once you’re done with this and run your plugin it will offer the following item:
The next step enabling the user to select the fields they want
to use in DTO. Here you only need to add the following implementation to
getAllOriginalMembers:
@Override
protected ClassMember[] getAllOriginalMembers(PsiClass psiClass) {
    return Arrays.stream(psiClass.getFields())
            .map(PsiFieldMember::new)
            .toArray(ClassMember[]::new);
}
The code takes all the fields from the class where the user invoked
the menu and converts them to PsiFieldMember instances. That will
eventually appear once the user presses the Generate DTO button:

Now comes the most interesting part: you need to generate a new DTO class based on the fields the user selected.
First, you override one more method from
GenerateMembersHandlerBase and create an empty DTO class in the same package
where you have the original class:
@Override
protected List<? extends GenerationInfo> generateMemberPrototypes(
        PsiClass psiClass, ClassMember[] members) {
    JavaDirectoryService directoryService = JavaDirectoryService.getInstance();
    PsiDirectory directory = psiClass.getContainingFile()
            .getContainingDirectory();
    PsiClass dtoClass = directoryService.createClass(
            directory, psiClass.getName() + "DTO"
    );
    return emptyList();
}
If you now run the plugin, you’ll be able to see the newly generated file in the end of the workflow.
The final step would be adding the fields to the generated class file.
You can achieve this using the following code (just replace
return emptyList() with this code):
Project project = psiClass.getManager().getProject();
PsiElementFactory factory = JavaPsiFacade
        .getInstance(project).getElementFactory();
return Arrays.stream(members)
        .map(PsiElementClassMember.class::cast)
        .map(PsiElementClassMember::getElement)
        .filter(PsiField.class::isInstance)
        .map(PsiField.class::cast)
        .map(property -> factory.createField(
                property.getName(), property.getType()
        ))
        .map(dtoClass::add)
        .map(PsiMember.class::cast)
        .map(PsiGenerationInfo::new)
        .collect(toList());
Here you take all properties and convert them to the required types. Out of these you create new fields.
In essence, this is all you need to make it work. Pretty easy, isn’t it?
Of course, there is much more to do in this code (validations, exceptional cases, etc.) but that is beyond the scope of this post.
The API is pretty rich and flexible. You can generate methods in the same way, or you can construct code blocks from a string representing the code, etc.
The full code can be found on GitHub.