Automating Website Release with Terraform, AWS, and GitHub Actions
So you’ve built a website, and you want to release it to the world? There are many unique ways this can be done. One of them is using AWS S3. It is simple, cheap, and convenient if you already use AWS. In this post, I will explain how to configure an S3 bucket to host a website, how to create the corresponding AWS resources using Terraform, and last but not least, how to automate the process so that whenever you push changes to your GitHub repository, they will be released automatically.

I would assume that you already have a Terraform/AWS project where you store your infrastructure code as well as a GitHub repository with your web project built using NPM.
First, I will create an S3 bucket. I will allow everyone to read its content (because it will host my HTML, JS, and CSS files). I will add a website configuration so that AWS will know where to direct people navigating the website.
In your Terraform project, create a website.tf file with the following content:
resource "aws_s3_bucket" "webiste_s3" {
  bucket = "my-mega-cool-app" # <--- replace this with your unique bucket name
}

resource "aws_s3_bucket_policy" "webisite_read_write_policy" {
  bucket = aws_s3_bucket.webiste_s3.bucket
  policy = jsonencode({
    "Version" : "2012-10-17",
    "Statement" : [
      {
        "Sid" : "PublicReadGetObject",
        "Effect" : "Allow",
        "Principal" : "*",
        "Action" : "s3:GetObject",
        "Resource" : "arn:aws:s3:::${aws_s3_bucket.webiste_s3.bucket}/*"
      }
    ]
  })
  depends_on = [
    aws_s3_bucket.webiste_s3,
    aws_s3_bucket_acl.webiste_s3_acl,
    aws_s3_bucket_website_configuration.webiste_s3_configuration
  ]
}

resource "aws_s3_bucket_acl" "webiste_s3_acl" {
  bucket     = aws_s3_bucket.webiste_s3.id
  acl        = "public-read"
  depends_on = [aws_s3_bucket_ownership_controls.webiste_s3_bucket_acl_ownership]
}

resource "aws_s3_bucket_website_configuration" "webiste_s3_configuration" {
  bucket = aws_s3_bucket.webiste_s3.id
  index_document {
    suffix = "index.html"
  }
  error_document {
    key = "index.html"
  }
}

resource "aws_s3_bucket_ownership_controls" "webiste_s3_bucket_acl_ownership" {
  bucket = aws_s3_bucket.webiste_s3.id
  rule {
    object_ownership = "BucketOwnerPreferred"
  }
  depends_on = [aws_s3_bucket_public_access_block.webiste_s3_bucket_public_access_block]
}

resource "aws_s3_bucket_public_access_block" "webiste_s3_bucket_public_access_block" {
  bucket                  = aws_s3_bucket.webiste_s3.id
  block_public_acls       = false
  block_public_policy     = false
  ignore_public_acls      = false
  restrict_public_buckets = false
}
Make sure to replace the bucket name with your own unique bucket name. It must be unique within the AWS region.
Now execute terraform apply. This should create six new resources in
AWS necessary for storing your website.
If you open the AWS console and navigate to your newly created bucket, you can find its public URL, which you can use to access your website. Go to the “Properties” tab of your bucket, scroll down, and you will see the URL.
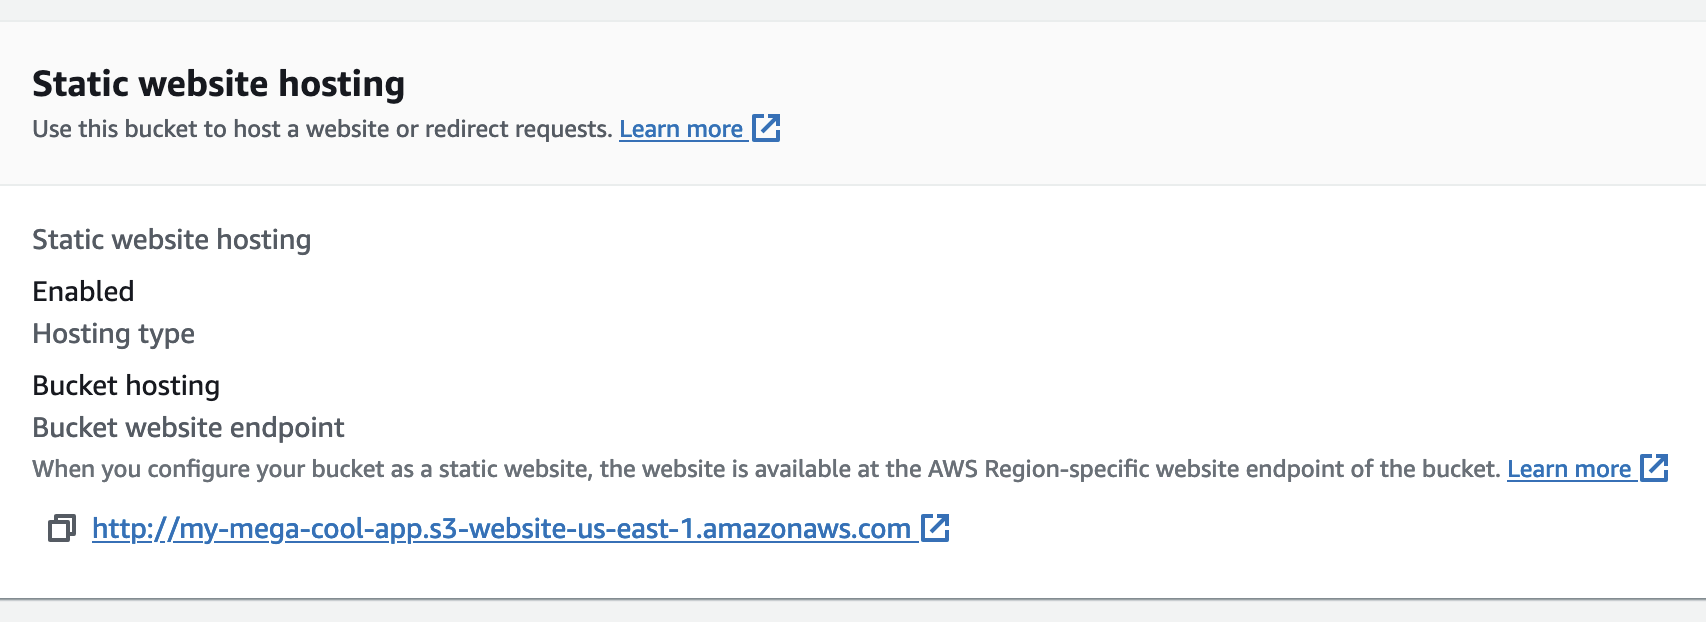
You will see a 404 error if you open it because the bucket is empty.
You can manually upload an index.html file, and it will start working. However,
the purpose of this post is to automate this process.
What I want to do is upload the prebuilt website every time its source code changes in a Git repository hosted on GitHub.
Let’s assume you have a React app that is built with NPM. I will create a GitHub Actions workflow that will build it and upload it to the bucket once it’s built. For this to work, GitHub Actions need to have access to AWS. Correspondingly, GitHub Actions would need access key and secret of an AWS user.
A good practice is to create a dedicated user that only has access to this specific
S3 bucket. I will do it in Terraform as well. Create a github_actions_user.tf file
with the following content:
resource "aws_iam_user" "github_actions_user" {
  name = "github-actions-user"
  tags = {
    "description" : "A user for GitHub Actions"
  }
}

resource "aws_iam_access_key" "github_actions_user_key" {
  user = aws_iam_user.github_actions_user.name
}

resource "aws_iam_policy" "github_actions_s3_upload_policy" {
  name        = "github-actions-s3-upload-policy"
  description = "Policy to allow S3 upload"

  policy = jsonencode({
    Version = "2012-10-17",
    Statement = [
      {
        Action = [
          "s3:PutObject",
          "s3:GetObject",
          "s3:ListBucket",
        ],
        Effect = "Allow",
        Resource = [
          "arn:aws:s3:::${aws_s3_bucket.webiste_s3.bucket}",
          "arn:aws:s3:::${aws_s3_bucket.webiste_s3.bucket}/*",
        ],
      },
    ],
  })

  tags = {
    "description" : "Policy for GitHub Actions user"
  }
}

resource "aws_iam_policy_attachment" "github_actions_user_policy_attachment" {
  name       = "github_actions_user_policy_attachment"
  policy_arn = aws_iam_policy.github_actions_s3_upload_policy.arn
  users      = [aws_iam_user.github_actions_user.name]
}

output "github_actions_access_key" {
  value = aws_iam_access_key.github_actions_user_key.id
}

output "github_actions_secret_key" {
  sensitive = true
  value     = aws_iam_access_key.github_actions_user_key.secret
}
After you run terraform apply, you will have a user in place that
can push data to your S3. To retrieve the user’s access keys, execute:
terraform output -json
This will print all the output variables that you have. Save the values
of github_actions_access_key and github_actions_secret_key for later.
There are no further Terraform changes needed. Now let’s move to a web app. If you have a repository with a web app, you can use it. If you don’t, you can create a simple web app using React and push it to a GitHub repository:
npx create-react-app my-app
Once you have a repository with a web application, you can configure GitHub
Actions to deploy the app to the S3 bucket. But first, let’s add an Access
Key & Secret to GitHub so that GitHub Actions will have access to the bucket.
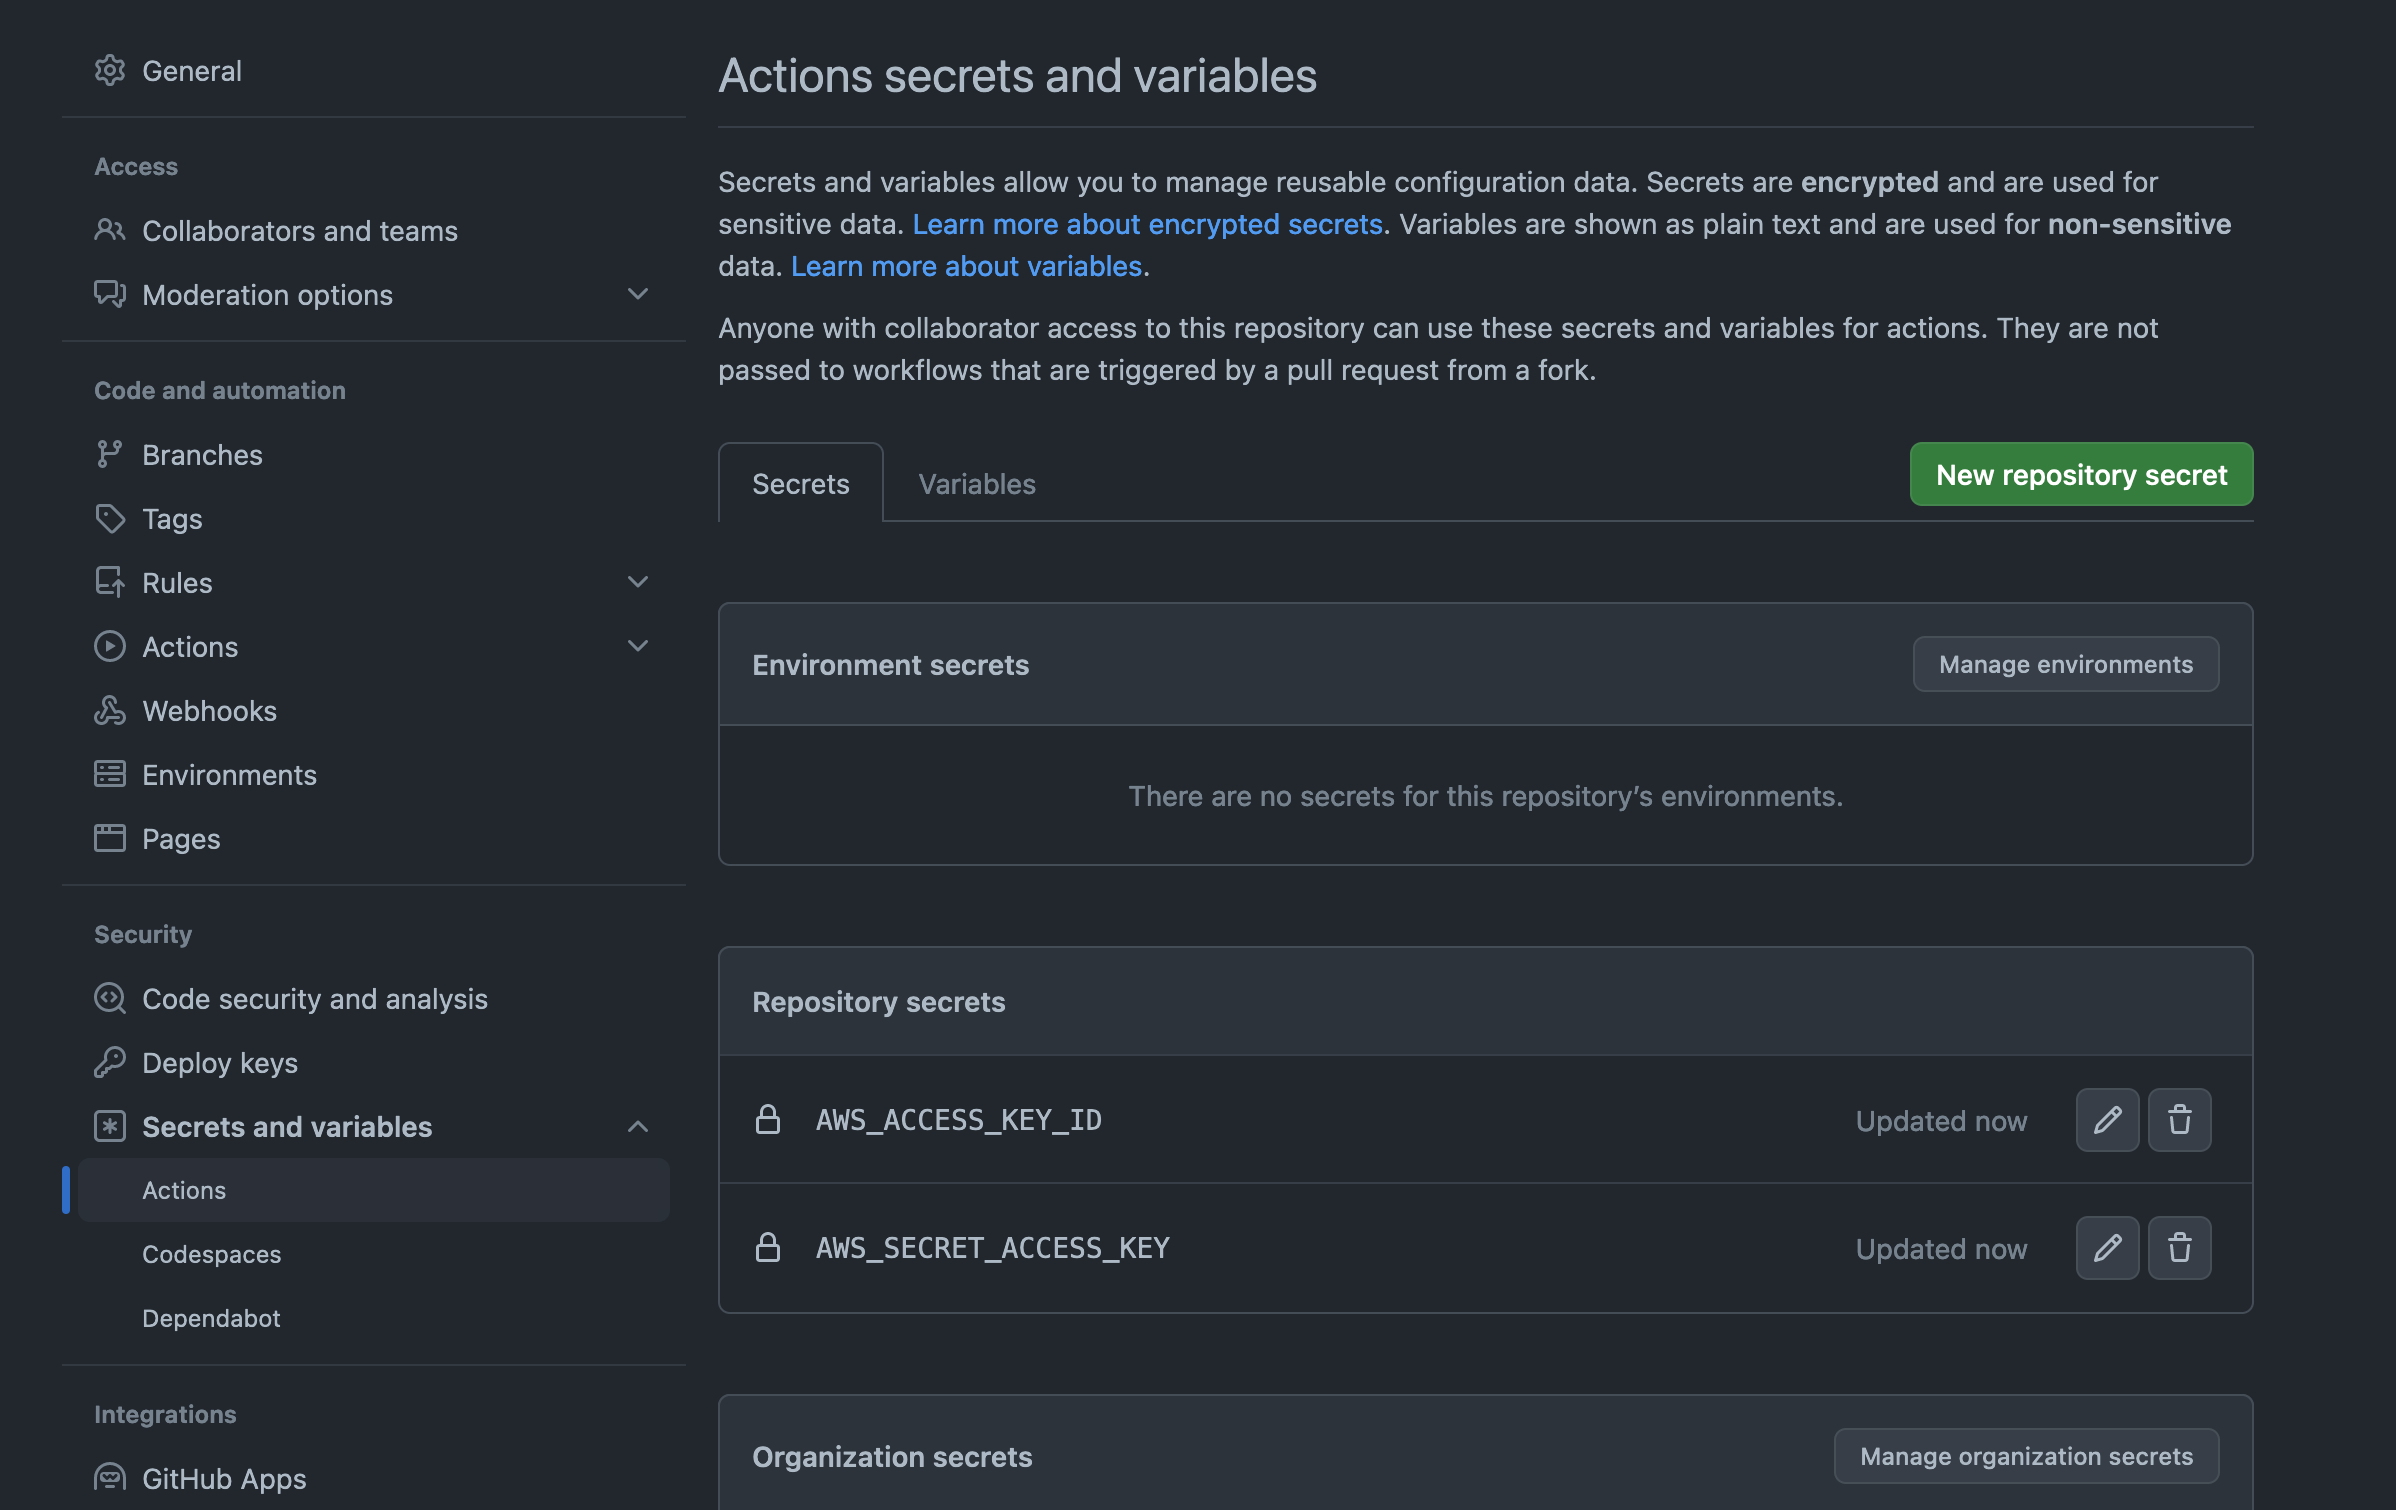
Open the “Settings” tab of your repository on GitHub, then navigate to
“Secrets and variables,” and click on “New repository secret.” Add two
secrets: AWS_ACCESS_KEY_ID and AWS_SECRET_ACCESS_KEY with the values
that you saved earlier.
Now, the only missing part is a GitHub Actions workflow script. Go ahead
and create a folder named .github/workflows. Inside this folder, create
a file named release.yml with the following content:
name: Releas
on:
  push:
    branches:
      - main # <--- if you use a different branch name,
             # replace it with your branch name
jobs:
  build:
    runs-on: ubuntu-latest
    steps:
      - uses: actions/checkout@v3
      - name: Set up Node.js
        uses: actions/setup-node@v3
        with:
          node-version: 18
      - name: Install dependencies
        run: npm install
      - name: Build project
        run: npm run build
      - name: Push build artifacts to S3
        uses: actions/upload-artifact@v3
        with:
          name: build-artifacts
          path: build # <--- a deafult build folder, change it to 'out' or
                      # 'dist' if your project config is different from mine
  deploy:
    needs: build
    runs-on: ubuntu-latest
    steps:
      - uses: actions/download-artifact@v3
        with:
          name: build-artifacts
          path: build # <--- one more place to change 'build'
                      # to 'out' or 'dist' if needed
      - name: Configure AWS credentials
        uses: aws-actions/configure-aws-credentials@v1
        with:
          aws-access-key-id: $
          aws-secret-access-key: $
          aws-region: us-east-1 # <--- if you are using a different
                                # region, replace it here

      - name: Push build artifacts to S3
        run: aws s3 sync build s3://my-mega-cool-app # <---
        # replace with your bucket name as well as change 'build'
        # to 'out' or 'dist' depending on your project config
Make sure you replace your bucket name from my-mega-cool-app with the actual
name you’re using. Additionally, if your web project is built to a directory
with a different name than “build,” make sure to replace it in three places
within the yaml file.
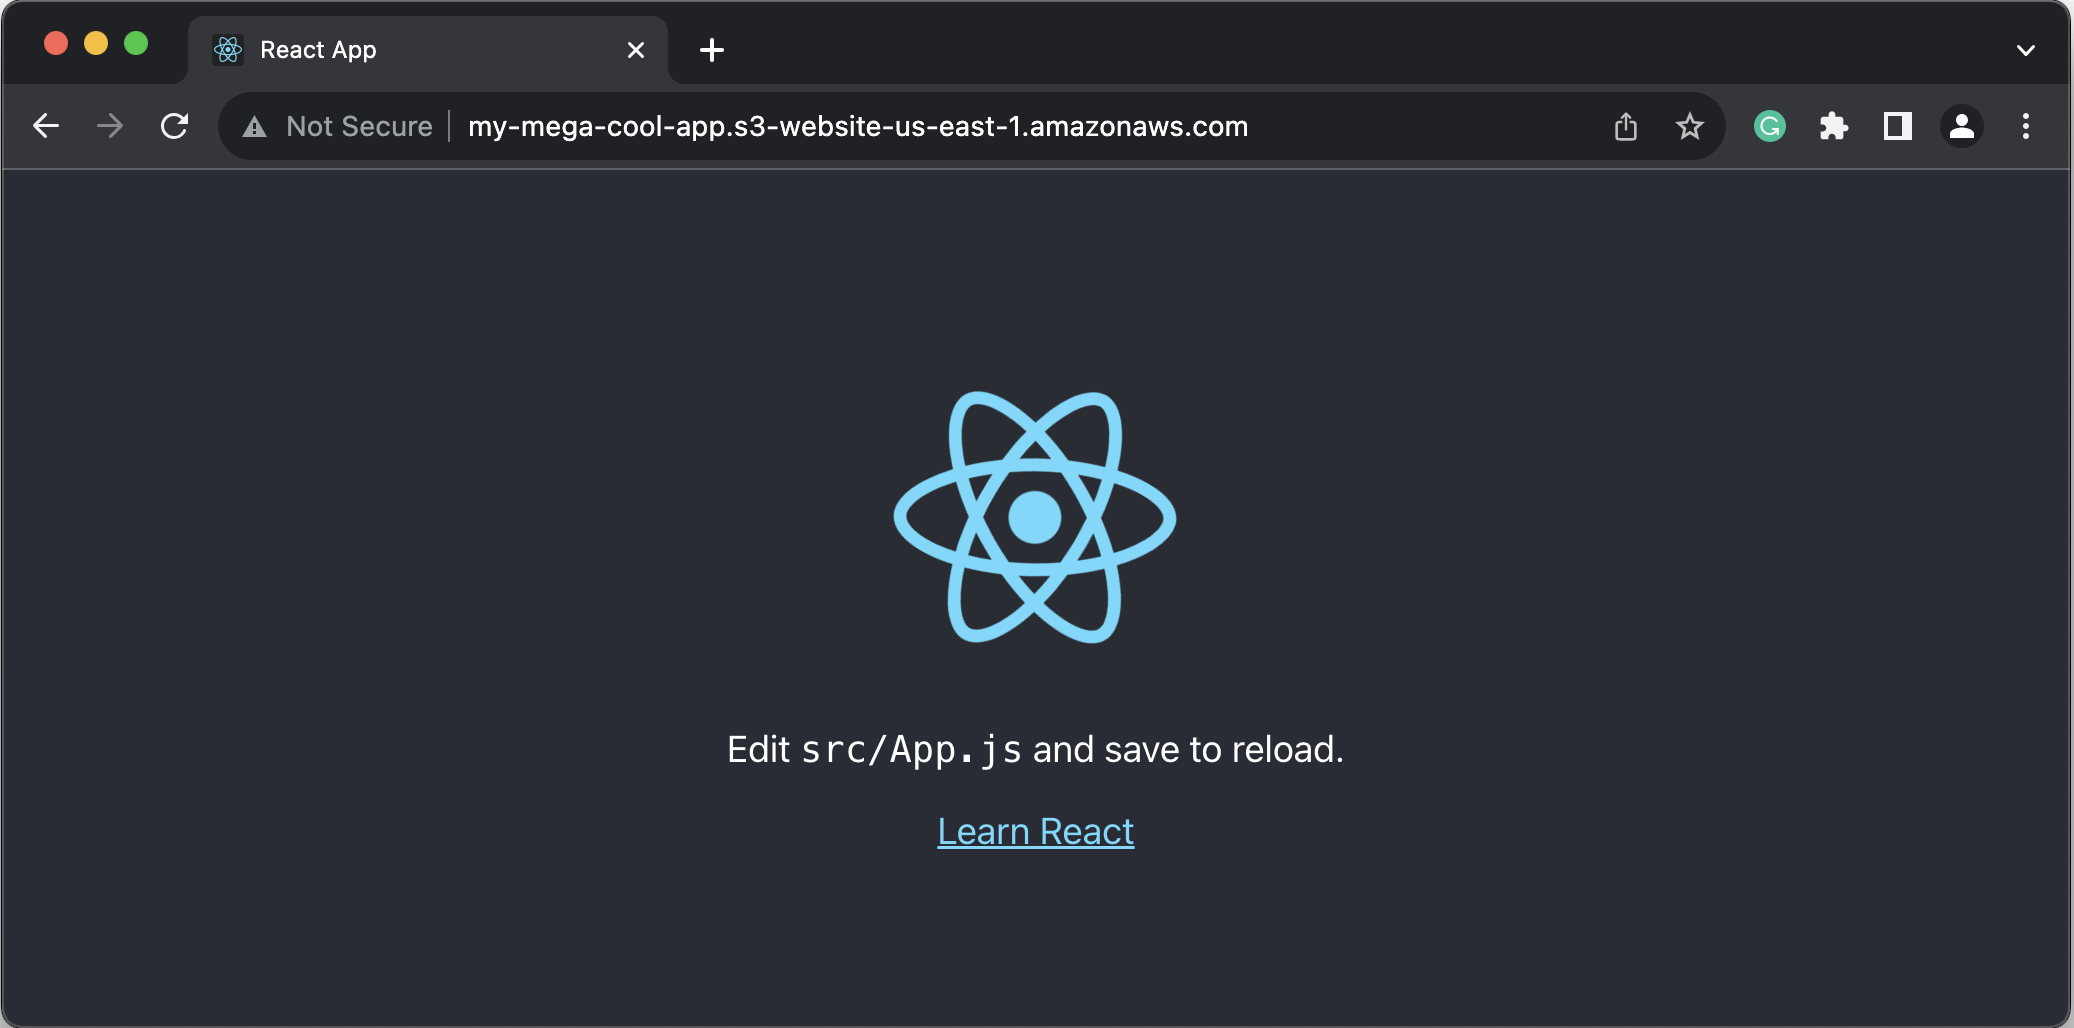
Once you’ve made these changes, commit the updates and push them to your main branch. Navigate to the “Actions” tab of the repo to check the build status. After it turns green, you can visit your newly published website.
Congratulations, you’ve reached the end of this blog post!
As you move forward, you might be interested in exploring the option of using your own domain name for your website. However, delving into that topic is a story for another day.
Thanks for reading, and happy coding!